Creating code windows for video editing.
The code window is an essential part of finding moments you see as coaches and want to share with your players. Be it a highlight to replicate again and again, something to correct or simply showing instances from practice or games, the fully customizable code window gives you a very powerful teaching tool.
Where Do I Start?
To access the code window manager go to the Analysis tab and then select Code Windows.

You can also access the code window manager from the Video Editor-

Often times, we as coaches throw together a code window trying to think of some basic areas or ideas from the game. While we'll go over the technical part of designing your window in part II, the "coaching" element of what to code for is the most important part. While there are coaching staffs that code to get statistics from the game, in order for them to be valid & reliable you must code for every instance that happened. More often, you are looking for critical areas that need to improve or be replicated in future games, so a couple of examples will get your teaching point across.
Video should reinforce what you say and do in practice using the same language, which will make a stronger imprint on your players when they both hear and see what you are talking about. Whatever terminology you use when describing in meetings, practice or games, should line up with what they can see while watching “what matters most” thru video.
Here’s a link to an excellent article to further explain this idea.
What Matters To How We Play?
What are the critical areas offensively, defensively, in transition, intangibles specific to your team? These are the things you should clearly define, practice and code for. Allowing players to view these moments in games and practice, is like students re-reading notes after a lecturer being able to rewind and review if they didn't quite get it the first time. Its a valuable learning tool and gives your players access whenever they make the time to jump online.
With our new editor, it gives you a much better visual layout of these "key performance indicators" and can lay them out depending on how you use the keyboard with hotkeys or visualize the game while analyzing.
We suggest writing this out on paper or as a staff on a whiteboard, which makes the next step much easier and more organized.
Click here for sport specific examples to help with your planning.
The screenshot below is a good illustration for getting started with a code window, now lets organize the grid and add color. (To see the full sized image, right-click or control-click (mac) and view the image in a new tab. This will make it full sized.)

How To Organize Your Code Window
Once you know what you want to code, now its about setting it up for when you are analyzing video. Some prefer to look at the game vertically, others horizontally or some combination of the two. In the picture above, I designed it to help with using hotkeys with the keyboard. You can place buttons anywhere on the "grid" to create a visually appealing and intuitive code window. However will help you visually, is what you should do, which is why coaching staffs may have the same categories but their own code windows to work with.
Adding color helps to further distinguish between areas you code for. You can use the preset colors or create your own shades, but the idea is to help organize rather than creating an easter egg design.
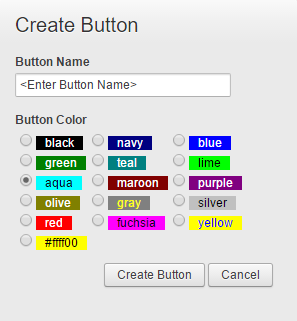
To add a button, click the  in a location where you would like to add the button. Then name the button, select a color, and click "Create Button."
You can also Edit a button if you need to change its name, abbreviated name or color. The "Clip / Row name" is what the clip will be called in the database. The "Button Label" is what the button text will look like. For example, the Clip / Row name can be "Attacking", but the button label can be "ATT" for short.

Edit Button Properties (Lead, Lag, 1-2 click, hotkeys)
From the Code Window Manager page select "Edit Button Properties." The next screen show below will allow you to change the settings for all of your code window buttons at once.
1- Clip / Row name--this is the name of the code button "row" that will appear in the clip player and what the player's will see.
2- Button label--this is a shorter name for your row/code button to have a cleaner/clearer appearance on the code window.
3- Lead Time Seconds--the # of seconds of video will be recorded before the moment you click a code button to begin recording. Example: you click a code button "offense" that has a lead time of 2 seconds; the beginning of the clip will be 2 seconds before you clicked the button.
4- Lag Time Seconds--the # of seconds that will be recorded after you click a code button to stop a clip.
5- Click Type--the choices are "1 click" or "2 click" buttons. 1 click buttons will record the lead and lag time for the given button; example is a button with a 5 second lead and lag time will record 10 seconds of video when you click the button. 2 click buttons need to be pressed twice, once to begin the clip and once to end the clip. 2 click buttons are generally used for longer play action events such as an offensive attack while 1 click buttons may be used for quick actions such as a goal save.
6- Hot Key--you can set a hot key for each code button to use your keyboard as a control mechanism for your code window. Click here to learn more about hotkeys.
